Generated Announcements
💡 Pro tip: If you’re new to the app, consider getting familiar with the basic features first.
TL;DR Summary
🎯 Use Windows (local), Azure, Edge, or ElevenLabs Text To Speech (TTS) to generate fully compatible sound files on the fly using your dynamic flight info
Important Note
💡 Continue to use existing sound packs like normal - reality is best, but…
This feature doesn’t replace your existing high-quality airline sound packs. It’s designed to fill in the gaps when you don’t have custom audio for specific announcements or airlines. Maybe you don’t want to use English files all the time etc. Use real recordings when available, but let this TTS handle the rest!
Why This Feature is Amazing
The Generated TTS feature is pretty interesting because:
- Always Tailored: You get announcements specifically tailored to your airline, no matter what aircraft or route you’re flying
- Local Language Support: Announcements can be in your local language, just like real-life airline operations
- Fully Customizable: Edit announcements to say exactly what you want, incorporating real flight context and details
- Cost-Effective: Azure’s free tier provides 8 hours of audio generation a month, and since these short clips are saved as reusable .ogg files in proper sound pack format, it’s unlikely you’ll need to pay for anything. You can use the nicer ElevenLabs as well, which has a great ‘Clone Voice’ feature.
Overview
The Generated TTS feature automatically synthesizes missing airline announcements using Windows (local), Azure, Edge, or ElevenLabs Text-to-Speech, providing a seamless fallback before default audio is used. This ensures your passengers always hear appropriate announcements, even when custom audio files are missing.
Setting up a TTS Provider
You can use Windows (local), Azure, Edge, or ElevenLabs. Windows voices are free and offline; Azure has a generous free tier; Edge uses Microsoft’s online TTS with no API key required; ElevenLabs has a limited free plan and paid options for cloned/custom voices. Here’s how to set them up:
Getting Started with Azure TTS
To use this feature, you’ll need to set up an Azure Text-to-Speech API key. I’ve found two excellent step-by-step guides that walk you through the entire process:
- docs.merkulov.design - Comprehensive guide from account creation to API key generation
- VitalPBX Blog - Detailed walkthrough with screenshots and specific steps
Important: You’ll need both your API Key and your Azure Region/Location for the app to work properly. Make sure to note both values when setting up your Azure Speech service.
Supports voice selection and adjusting rate/pitch per announcement, see section below.
Getting Started with Edge TTS
Use Microsoft’s online TTS via the Edge provider (no API key required). Supports voice selection and adjusting rate/pitch per announcement. For full capabilities and technical examples, see the edge-tts project: https://github.com/rany2/edge-tts. Some users report connectivity issues with this but it’s free and worth a try. You don’t need Edge or any browser, it’s more the name of the underlying web API.
Getting Started with ElevenLabs TTS
You can sign up for a free key and try out these voices. A paid plan allows you to clone your voice and do all sorts of weird and wonderful things. There are free voices to use as well but limited compared to Azure.
Here’s a short guide on how to get your API key: ElevenLabs API Key
..or to create an API key you can go here once you have an account: https://elevenlabs.io/app/settings/api-keys
IMPORTANT If you restrict the API key you’ll need the follow permissions on it for this to work:
- Text to Speech = Has Access
- Voices = Read Only (so we can list the voices in the app)
- Models = Read Only (so we can list the models in the app, the default one is usually fine)
Models See the ElevenLabs documentation on the best model to use. Flash is cheaper than MultiLang for example but reduced quality. In this app’s case it doesn’t really matter about super low latency.
Getting Started with Windows voices (SAPI v5 / WinRT/Core)
Use locally installed Windows voices to generate audio, fully offline. Supports both classic SAPI v5 (64‑bit) voices and newer WinRT/Core voices available via Windows language packs and the Windows Speech SDK (0.5.1 added support for more Windows voices). You can also use commercial voice packs that install as SAPI v5 voices.
This option is free and simple to use. If a voice doesn’t appear, ensure it is a 64‑bit SAPI v5 voice or a supported WinRT/Core voice installed for your user.
How It All Works
Source Text Priority
The system follows this lookup order to find announcement text to say:
- Airline-specific: example:
Airline/BoardingWelcome.txt(highest priority, an override used per airline, edit in the Generated tab with the airline selected and hit ‘Save txt’) - Global default: example:
Default/SafetyBriefing.txtnext priority if no airline one found (you can edit this in the app and it’ll save your version in yourDefaultfolder) - Built-in template: Automatically copied to the airline folder on first use, of which you can always revert back to.
Output and Storage
Generated announcements are saved as .ogg files alongside their corresponding .txt files in the airline folder. Once created, these files are reused automatically on subsequent flights (unless set to overwrite), eliminating the need for repeated API calls.
To regenerate an announcement: Simply edit the .txt file and delete or rename the associated .ogg file.
Performance and Reliability
- Generation timeout: 5 seconds maximum, so generated on demand without you noticing
- Fallback behavior: If generation fails or times out, the normal audio fallback system takes over
- Efficient caching: Prevents unnecessary API usage for repeated announcements
Example Use Case 1: Virtual Airline Setup - On the Fly Generated
Let’s walk through setting up a virtual airline that doesn’t have a sound pack yet and you want to generate the sound files as you go on a flight:
Step-by-Step Setup
- Create Airline Folder: Create an
XYZfolder in your sound packs directory for your virtual ‘XYZ Airlines’ (or enable Airline Folder Auto Creation below) - Pick a Voice: In the new
Settings / Generatedtab choose the nationality and accent that works best for the airline, over 100 to choose from. Remember the ‘Test Voice’ uses your free credits, but you can select an existing announcement and try it out first. The generation uses the last one selected or use the ‘Insert Voice’ to put in a hint on what you want to use for this announcement. - Set Up Flight: File a SimBrief plan or set a callsign in MSFS with
XYZ 123as your flight id - Automatic Generation: The new announcements will be generated and play with your flight info, automatically saving
.oggsound files as it goes, filling placeholders with real data. - Add Music: You’ll still need your own
BoardingMusic.ogg- go hunt for some disco or something classy to use! 🕺 - Customize Your Airline:
- Rename the generated files to match your preferences, e.g.
AfterTakeoff[1].oggto keep ‘sets’ of numbered files together. So either hand curate the files or let it regenerate on the fly using the placeholders. - Create airline-specific text files like
BoardingWelcome.txtin your airline folder - remember it doesn’t have to be in English anymore or use an English accent voice. The TTS works great across accents and languages.
- Rename the generated files to match your preferences, e.g.
Pro tip: If you only have the
.txtfile (and no.ogg), the system will read it and generate the audio on demand - it’s where the ‘Save txt’ gets saved to.
Example Use Case 2: Virtual Airline Setup - Pregenerated Audio
Here’s the steps for setting up a series of announcements up front before you fly:
Step-by-Step Setup
- Create the airline folder
- In your sound packs, create
XYZ(e.g.,...\Announcements\XYZ). Or use Airline Folder Auto Creation to have it created for you the first time.
- In your sound packs, create
- Open Settings → Generated
- Pick your TTS voice (you can use Test Voice to hear it first).
- Select the target airline
- Set the Airline dropdown to
XYZ(not Default). The Generate buttons will enable.
- Set the Airline dropdown to
- Pick a template
- In the left template list, choose (for example)
BoardingWelcome. Items in bold/green already have a matching.oggin the selected airline.
- In the left template list, choose (for example)
- Edit the text (optional)
- Use the right editor to customize. You can use placeholders like
{AIRLINE_NAME},{ORIGIN_CODE},{DESTINATION_NAME},{AIRCRAFT_NAME},{TIME_OF_DAY}.
- Use the right editor to customize. You can use placeholders like
- Save the text to the airline folder
- Click “Save txt”. This writes
XYZ\BoardingWelcome.txt(you’ll be asked to overwrite if it already exists).
- Click “Save txt”. This writes
- Generate the audio
- Click “Generate” to create
XYZ\BoardingWelcome.ogg, or - Click “Generate As..” to enter a different filename (e.g.,
BoardingWelcome[1].ogg) before saving. - Click “Generate All” to generate a complete set for the current flight from your selections; ideal for batch pre‑generation and respects per‑announcement Insert Voice hints.
- Success is confirmed; the template list will refresh highlighting for files that now exist.
- Click “Generate” to create
- Preview and use
- Switch to Sound Files to preview; the new
.oggappears underXYZ. - At runtime, the app will just play your pre‑generated
.ogg(no TTS call needed).
- Switch to Sound Files to preview; the new
Tips
- To build a set (e.g., multiple versions), repeat “Generate As..” with names like
AfterTakeoff[1].ogg,AfterTakeoff[2].ogg. - You can do the same flow with
Defaultselected to pre‑generate fallback audio.
Multi-Lingual Announcements
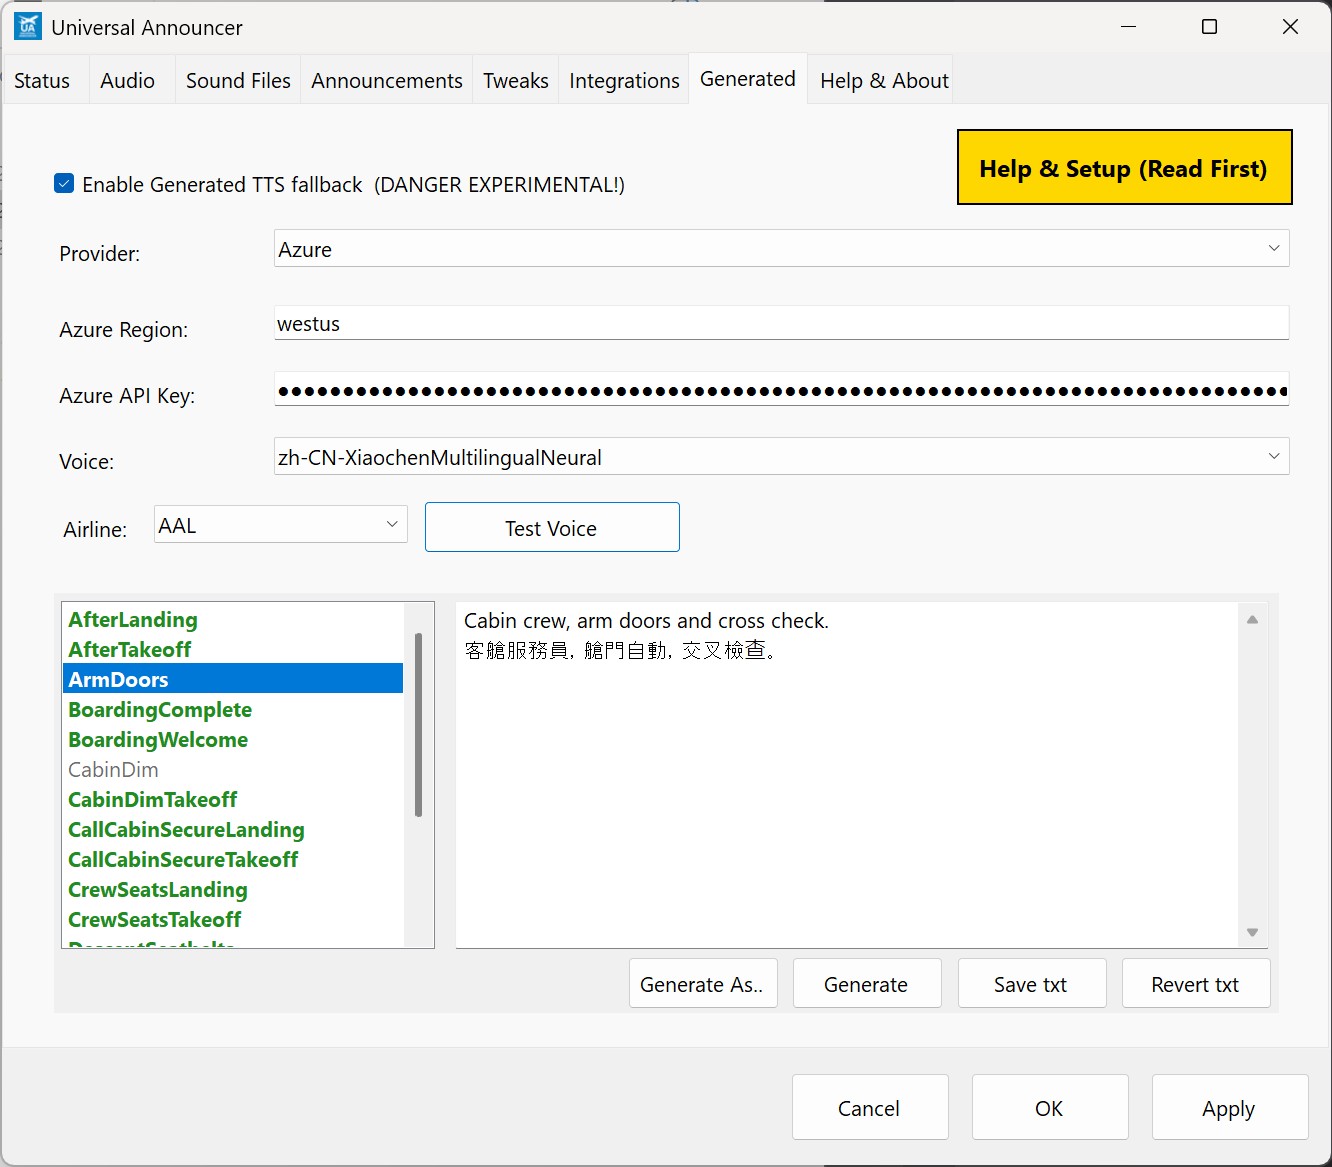
It is fine to put two or more languages in an announcement, but on Azure they will work better if you use a ‘Multilingual’ type voice. This example shows such a voice (language-Country-Name+MultilingualNeural) in use with English and Cantonese:
Configuration
Access the Generated TTS settings in Settings → Generated:
- Enable/Disable: Toggle the feature on or off. Default off.
- Azure Region: Select your preferred Azure service region e.g.’westus’ or ‘westeurope’ as you set up in Azure earlier.
- Model: Select your preferred ElevenLabs model, fast/turbo is fine usually and less credits.
- API Key: Enter your Azure or Elevenlabs Text-to-Speech API key
- Voice: Choose from available Azure, Edge, or ElevenLabs TTS voices. Pick an accent appropriate for the airline or region.
- Windows Voices: Choose from local Windows SAPI v5 and WinRT/Core voices.
- Airline Folder Auto Creation: When enabled, the app will create the target airline folder automatically during generation/playback based on SimBrief or your MSFS callsign/airline selection.
- Automatic Generated Mode: Optionally overwrite existing
.oggfiles automatically; optionally only when text is dynamic.
💡 If the voices seem too ‘clean’ you can use the new ‘Audio’ tab ‘PA Audio Mix’ setting
This feature simulates the audio pattern of a PA system, with a few presets on how light or heavy. The generated voices will use this if this option is turned on (it is off by default)
Testing Your Setup
Use the “Test Voice” button to verify your configuration:
- First click: Reads the selected template’s editor text (if available) or a default test message
- Second click: Stops the playback
Template Management
Built-in Templates
The template editor displays all available built-in announcement templates. Select any template to load its content for editing.
Template Actions
- Save: Writes your customizations to
Default/Name.txt(creates a global override if no txt found in the airline) - Revert: Removes the override, restoring the original built-in template
- Generate: Creates the
.oggfor the currently selected template - Generate As..: Creates the
.oggwith a custom filename - Generate All: Generates a complete set in one click based on current Airline/voice selections; useful if you prefer manual generation without clicking each item. Respects per‑announcement Insert Voice hints.
Per‑Announcement Voice Overrides
You can specify a different voice for each generated announcement. Use the Insert Voice button in the template editor to add a voice hint on the first line of the template. Overrides can be set per Default or per‑Airline template so, for example, a pilot and an attendant can use different voices and in different accents.
If no override is present, the global voice selection is used (the one you last set).
Note: For a more structured approach to assigning different voices to pilots and flight attendants, see the Roles section below.
TTS Rate and Pitch Adjust. For the Azure and Edge TTS generators allow for speed rate and pitch changes within the generated voice, adjusting the generated output as required. ElevenLabs does not support the standard SSML, so can’t do this as yet, and Windows TTS is super basic, so just those two for now. Example use in the app:
##Voice: Edge/en-US-LunaNeural
##rate:-50%
##pitch:-50Hz

Welcome aboard this flight.
So this would pick a voice from Edge called ‘en-US-LunaNeural’, play at half speed (e.g. minus 50%) and be of a lower pitch than the default voice (e.g. minus 50Hz). There isn’t much validation on values, so you can go full ‘chipmunk on sugar’ if you really want. The Rate is in positive and negative (100% is the default) and Pitch is via hertz negative or positive (0Hz is no change).
Roles
The Roles feature allows you to assign different voices to Pilot and Flight Attendant announcements, making it easy to maintain consistent voice assignments per airline without manually specifying voices in each template.
How Roles Work
You can mark generated text templates with a role using the ##Role: directive at the top of the template:
##Role: Pilot
Hello, I am a pilot, I feel compelled to tell that to everyone as part of my training!
Or for Flight Attendant announcements:
##Role: FA
Ladies and gentlemen, welcome aboard this flight.
Default behavior: If no ##Role: is specified in a template, it assumes the Flight Attendant (FA) role.
Role Configuration
Role assignments are saved per airline (or in the Default folder as a fallback) in a roles.json text file. This file stores voice assignments for each TTS provider and role combination. You can access this via the ‘Roles’ button on the Generated tab.
Example roles.json structure:
{
  "Edge": {
    "Pilot": "en-IE-ConnorNeural",
    "FA": "en-IE-EmilyNeural"
  },
  "Azure": {
    "Pilot": "en-US-AriaNeural",
    "FA": "en-US-JennyNeural"
  }
}
In this example:
- Any announcement with
##Role: Pilotuses the Irish Connor voice (Edge). - Any announcement with
##Role: FA(or no role specified) uses the Irish Emily voice (Edge).
Tip: You may need to ‘Revert’ any previously edited templates or manually add the ##Role: Pilot or ##Role: FA text in the template editor and re-save them to use the role system.
Roles vs. Voice Hints
Roles provide a structured way to assign voices, while voice hints (##Voice:) allow per-template overrides. You can use both:
- Roles are ideal for consistent Pilot/FA voice assignments across multiple templates
- Voice hints are useful for one-off customizations or when you need a specific voice for a particular announcement
Auto Roles
The Auto Roles feature automatically selects appropriate Pilot and Flight Attendant voices based on the airline’s home country, eliminating the need to manually configure roles for each airline.
How Auto Roles Works
When ‘Auto pick Roles based on Airline Country’ is enabled in the Generated tab, the system:
- Identifies the current airline (from SimBrief or as overridden in the Status tab)
- Determines the airline’s home country (local lookup see
Tools\airlines_full.jsonin your install folder) - Automatically selects appropriate voices matching that country’s language/locale e.g. the voice name.
- Picks male and female voices at random, with a bias toward the country’s industry average
Examples:
- BAW (British Airways): Automatically selects
en-GBvoices (e.g., British English) - AFR (Air France): Automatically selects
fr-FRvoices (e.g., French) - LUF (Lufthansa): Automatically selects
de-DEvoices (e.g., German)
This feature works seamlessly with the Roles system - if Auto Roles is enabled, it will automatically populate the role assignments based on the airline’s country. You can still manually override these selections if desired.
Note: Auto Roles requires the airline to be identified (via SimBrief or manual override) and a matching voice to be available for that country/locale in your selected TTS provider. You enable this feature in the Generated tab as disabled by default.
‘Replace existing .ogg’ Automatic Generated Mode
When generating announcements, you can allow the app to automatically overwrite existing .ogg files.
Options in the Generated tab:
- ‘Replace existing .ogg’ Allow overwrite: If enabled, generation will replace an existing sound file automatically.
- ‘Regenerate only if dynamic’ Only overwrite when text is dynamic: Restricts overwrites to templates that include dynamic placeholders (e.g., time, weather, SimBrief values), avoiding unnecessary updates when the text is static.
This is ideal for “hands‑off” workflows where your templates include dynamic placeholders and you want fresh, context‑accurate audio each flight without manual cleanup.
Available Placeholders
Enhance your announcements with dynamic content using these placeholders, so you can place these in the text:
| Placeholder | Description |
|---|---|
{AIRLINE_CODE} |
Airline ICAO code (e.g., DAL) |
{AIRLINE_NAME} |
Airline name (e.g., Delta Air Lines) |
{ORIGIN_CODE} |
Origin airport ICAO code (e.g., KLAS) |
{ORIGIN_NAME} |
Origin airport name (e.g., Harry Reid International) |
{ORIGIN_CITY} |
Origin city/municipality (e.g., Las Vegas) |
{ORIGIN_FULLNAME} |
Origin full name (e.g., Harry Reid International, Las Vegas) |
{DESTINATION_CODE} |
Destination airport ICAO code (e.g., KJFK) |
{DESTINATION_NAME} |
Destination airport name (e.g., John F. Kennedy International) |
{DESTINATION_CITY} |
Destination city/municipality (e.g., New York) |
{DESTINATION_FULLNAME} |
Destination full name (e.g., John F. Kennedy International, New York) |
{AIRCRAFT_CODE} |
Aircraft type ICAO code (e.g., A320) |
{AIRCRAFT_NAME} |
Aircraft type name (e.g., Airbus A320) |
{TIME_OF_DAY} |
Morning, Afternoon, or Evening (based on local sim time) |
{LOCAL_TIME} |
The sim’s local time spoken naturally, e.g. great to use in the ‘AfterLanding’ for telling people what to set their watches to (do people still have watches?) ‘The time here in {DESTINATION_CITY} is {LOCAL_TIME}.’ == ‘The time here in Chicago is 5:14pm’. |
{DESTINATION_WEATHER} |
Summary of the conditions from the METAR in simbrief of the destination airport. For example, if it’s IFR and raining then it’ll be something like ‘the weather is ‘‘not so good, with heavy rain’’’. So it says a friendly general weather statement from the technical METAR it has. |
{DESTINATION_TEMPERATURE} |
Destination temperature in Celsius (included in phrase spoken) |
{DESTINATION_TEMPERATURE_F} |
As above but spoken as Fahrenheit |
{LOCAL_TIME_24H} |
Local time as 24‑hour HH:MM numeric (e.g., 18:05) for multilingual TTS |
{FLIGHT_TIME} |
Flight time spoken as spoken duration (e.g., ‘2 hours 14 minutes’). |
{FLIGHT_TIME_HHMM} |
Flight time in HH:MM numeric for multilingual TTS |
{DESTINATION_TEMPERATURE_C_NUM} |
Destination temperature as a numeric Celsius value |
{SCHED_DEP_LOCAL_24H} |
Scheduled departure in local time (origin) HH:MM |
{SCHED_DEP_UTC_24H} |
Scheduled departure in UTC time HH:MM |
{SCHED_ARR_LOCAL_24H} |
Scheduled arrival in local time (destination) HH:MM |
{SCHED_ARR_UTC_24H} |
Scheduled arrival in UTC time HH:MM |
{DEP_STATUS} |
Example outputs: ‘We expect to depart on time.’ / ‘We are departing late.’ / ‘We expect to depart early.’ |
{ARR_STATUS} |
Example outputs: ‘We have arrived on time.’ / ‘We have arrived late.’ / ‘We have arrived early.’ |
{DEP_LATE} |
Human duration, e.g., ‘2 hours 5 minutes’ |
{DEP_EARLY} |
Human duration, e.g., ‘5 minutes’ |
{ARR_LATE} |
Human duration, e.g., ‘4 hours’ |
{ARR_EARLY} |
Human duration, e.g., ‘4 hours 15 minutes’ |
{DEP_LATE_MINUTES} |
Integer minutes late (number only), e.g., 125 |
{DEP_EARLY_MINUTES} |
Integer minutes early (number only), e.g., 5 |
{ARR_LATE_MINUTES} |
Integer minutes late (number only) |
{ARR_EARLY_MINUTES} |
Integer minutes early (number only) |
Notes:
- If a lookup isn’t found, the placeholder resolves to empty.
- Name/city data is loaded from Tools JSON datasets shipped with the app. Feel free to edit it.
- If you are missing something from above, check out the XML Placeholders for simbrief data spelunking below.
- Numeric placeholders above are returned as numbers so they read correctly in non‑English voices.
- The *_MINUTES placeholders return numbers only; useful for non‑English voices/locales.
Example valid txt entry: “Ladies and gentlemen, good {TIME_OF_DAY}. Welcome on board our {AIRLINE_NAME} flight to {DESTINATION_FULLNAME}, on this {AIRCRAFT_NAME} aircraft. Our {ORIGIN_CITY} based crew is pleased to be with you.”
Conditional Placeholder ‘IF’
Use {IF ...} to conditionally include text based on placeholder presence or a non‑zero numeric value. The content after {IF ...} up to the next newline is spoken when the condition is true. Use {END} to wrap multi‑line conditional blocks. Blocks can be nested.
Single‑line examples:
{IF ARR_LATE} We’re arriving {ARR_LATE} late today.
{IF ARR_EARLY} Good news, we’re arriving {ARR_EARLY} early.
{IF ARR_LATE_MINUTES} Numeric late minutes: {ARR_LATE_MINUTES}
Multiline example:
{IF ARR_EARLY}
Good news, we've caught up some time and we’re arriving {ARR_EARLY} early today.
Thank you for your patience.
{END}
Cruise Announcements
Use the flight’s elapsed air time to trigger cruise announcements. Enable this stage in the Announcements tab by turning on CruiseElapsed. IT IS OFF BY DEFAULT!
How triggers work
- Create files named like
Cruise.oggto trigger at 50% elapsed air time. It’s basically an alias for 50% through. - Or use percentage‑based names like
CruiseElapsed25Percent.ogg,CruiseElapsed66Percent.ogg,CruiseElapsed70Percent.oggto trigger at those points. You can have many per cruise e.g. a drinks service, breakfast before you arrive etc. - Works from SimBrief planned en‑route time (air time). The sim’s elapsed flight time is used for progress, not real time, so pausing or time acceleration is respected.
- Short flights (< ~1 hour) will compress timing slightly so mid‑cruise announcements still occur before descent.
You can provide .ogg files, or .txt files that will be generated on the fly using placeholders.
Helpful placeholders for cruise examples
{LOCAL_TIME}— spoken local time, great for after‑landing or time checks{DESTINATION_WEATHER}— friendly summary derived from destination METAR{DESTINATION_TEMPERATURE}/{DESTINATION_TEMPERATURE_F}— temperature in C/F- XML lookups like
{xml_number<general><route_distance>},{xml_number<general><initial_altitude>},{xml_digits<general><flight_number>}for rich SimBrief data
Tip: The Status and system tray now show a hint of the Cruise elapsed % the app thinks you’re at, to help you tune when to say thing.
Note:
- Previously, generated files had to be manually removed to regenerate. See Automatic Generated Mode below for new options to overwrite automatically.
XML Placeholders
As of 0.4.5 you can also now directly address simbrief info from XML elements of the generated OFP.
What you do is check your simbrief generated OFP data in a web browser (e.g. https://www.simbrief.com/api/xml.fetcher.php?username=fearlessfrog) and then grab the elements you need and want to use in the announcement, e.g. these all work:
“Our captain today is {xml<api_params><cpt>}.”
“Flight number is {xml_digits<general><flight_number>}.”
“Distance today will be {xml_number<general><air_distance>} miles.”
So ‘xml’ will just say it verbatim, ‘xml_digits’ will read each digit (good for a flight numbers etc) and ‘xml_number’ will use more human sounding number formats, e.g. ‘1024’ is then said as ‘one thousand and twenty four’.
Best Practices
- Keep text natural: Write announcements as you would speak them naturally
- Avoid complex formatting: SSML and tag variants are not yet supported, but looking at it, e.g. pitch, speed
- Test thoroughly: Use the Test Voice feature to ensure your templates sound correct
- Plan for fallbacks: Design templates that work well even when some data is unavailable
- Audio Mix: Use the ‘PA Audio Mix’ setting on the Audio tab to simulate a PA system. Toggle off if you prefer the clean TTS output.
Note: This feature provides a robust solution for missing announcements while maintaining the authentic airline experience your passengers expect.